Complete Mobile Repairing Course | How to Repair Any Mobile Phone Problem!
Complete Mobile Repairing Course
this world becomes very easy when you look at a mobile PCB then fully understand that this IC controls these this component control these and if this component is not here or it’s bad this will happen to the phone okay so what is it this video is about I want you to fully understand a mobile PCB and the reason why I want you to understand the things that I want to show you on this video today is because I want you to be like when you see in your workplace on someone’s bring a phone telling you for example that the phone is not switching
on as soon as you open the phone then look at the PCB you will know that you have to check this section you have to check this component this way so if they bring a phone that it has a wireless problem then you will know that you have to check this section then check this component on that section and understand the things that you’re gonna check when a phone is having some particular problems okay let’s just jump into the video because this video will be short meanwhile we have a lot to talk on on this video okay so if you get a phon
- Complete Mobile Repairing Course
meanwhile the phone is not switching on for example this mobile PCB is not switching on so what is it you’re gonna check that is what I want you to understand if you get a phone meanwhile the phone is having Wireless problem what is the section that you’re gonna check and what are the components that you’re gonna check so these are the things in which I want you to understand in this video because understanding it just on this mobile PCB right in front of me right now you can understand it on any mobile PCB okay so let me just
highlight you about this and if you are here and you don’t understand anything then 18 you still need to watch some of my videos in which I will keep my playlist in the comment section and in the description that you can see a lot of videos that I will help you understand this video more better okay so if you get a phone for example you get this phone right in front of me and the phone is not switching on then you try checking you try I think you guys know how to use a Multimeter then you try chicken and you
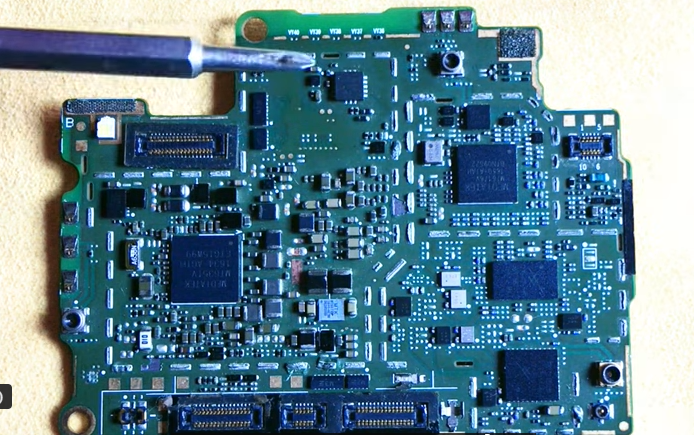
see that the phone is shorting for example if it’s shutting directly from the battery connector which is the battery connector right here if the phone is fully shotting from the battery connector which means that the positive and the negative battery connector is connected so you will need to understand that that problem is coming from the power section of the mobile PCB and that is why you will need to know the power section on that mobile PCB and all the components that are dealing with a high voltage for
shorting always caused by components which I deal with dealing with high voltage or maybe the exact voltage that comes out from the battery connector so what are the components that can short a phone to be fully shotting to the extent that you will be shorting on this terminal I want you to understand this in this PCB this is the power section of this PCB when I talk about power section I’m talking about the sections on a mobile PCB that distribute voltages that takes the voltage from the charging port or
from the battery connector then distribute it to other parts of a mobile PCB so this is the power section on this PCB and if any component is shorting on this power section on this PCB it will be very easy for the phone to fully short to the accent that it will show and this battery connector right here so because I said that components on the power section that if they are short and they will fully short the PCB does not mean that you just have to go and then remove anything that you see that is shorting because it’s the power section
okay it depends on the motherboard and the reason why I said so is because there are always some capacitors on a mobile PCB which I mean to be shorting and they are shortened because of the low resistance between them caused by the CPU okay I tell you what yeah I keep getting a lot of messages guys messaging me sending me pictures of capacitors on a mobile PCB that I shot in even when they keep removing them even they when they have removed all the capacitors completely then the pad will still be shorting what I want you to understand
that you need to identify the CPU capacitors on the PCB so like I said on this PCB this is the power section but if these capacitors are shorting I won’t need to do anything about them because these capacitance right here are CPU capacitors you might be wondering why I know that these are the CPU capacitors so if I test around here and these capacitors are short in I don’t have any problem with that I tell you what but if I check on right here and any capacitor is shot in around here then I will start removing the capacitor
testing and using my short killer to see the capacitor that is shorting okay let me tell you what let me show you how I get to know that these capacitors right here are the CPU capacitors okay if I turn the motherboard on the other side right here you will see that the CPU and the emmc are right here so if you check on this other side you will see that you won’t see any CPU capacitors around here and the CPU capacitors are always a lot of them which have been mounted in one area you understand and any phone needs to have a
CPU capacitor section so because I did not see them right here I check on on this other side I check on this other side and I know that these are the CPU capacitors and because of the way that they have been mounted I know that these are the CPU capacitors and they will always be shortened so when you are checking shotting try avoid touching this area on a mobile PC so if you check shorting on a mobile PCB and you see that the power section is fully shotting meanwhile there is no component hitting on that mobile PCB
then you can use your short killer on the components that are shorting so that it will heat up false heat up the component that is fully shortened so if it’s short indirectly from the battery connector you can use your short killer to do that or you can use your multimeter to find the components that are shorting and start removing removing them one by one in case if you don’t have a short killer so I was talking about shorting on this power section and that is what I will talk on right here so the next thing that I want us to go
for is wireless connection so when I talk about wireless connection problem on a PCB I’m talking about like no Network Bluetooth not owning Wi-Fi not turning on so what is the section that you’re gonna check and what are the things that you’re gonna check so if this piece is having a wireless connection problem maybe no network with the or Bluetooth having problems then I’m going to come right here to this section this is the wireless connection section on this PCB so like I said this is an highlight I
know that you guys know about these because I have talked about this on this video so you can come right here and start checking everything that you want to check on right here because right here this is the wtr the network main Network IC of this PCB you understand so this main Network IC has Bluetooth and Wi-Fi integrated in this IC in most phones but in this phone this IC right here only works with network the phone has a different Bluetooth and we see IC in which I can show you on this other side so for this phone this is the Wi-Fi and
the Bluetooth IC and I have a video on how you can identify all mobile ices so this will help you do that so I just want you to understand the sections that you’re gonna check when the phone is having some problems on a mobile PCB and going back to shorting so if your phone is shutting and you check the power section and you don’t see any shooting around this place does not mean that the component that is shot in the phone must be on the power section you might have to check the other sections on the PCB then check the input
of those sections check the components that are receiving the input voltage that needs to power up those sections like this network section right here so if you look at this network section then you see a capacitor which is big as this one you will see that it deals with a high amount of voltage than any other component on this network section which means that this bigger capacitor right here can still shop the full PCB okay I hope that is clear for you so let me see what we’re gonna talk about right here on this other side
okay cool so you look at this other side you will see that we have our charging IC right here which is in the our section this charging IC deals with a high amount of voltage which is considered as a power section because it also distribute voltage like to the to the battery then send signal charging signal signals the CPU you understand so if you get a phone that is having sound problem that is the most complicated problem that I see all these days that people I keep asking me questions about sound problem you need
to understand the sound section you need to understand no the sound IC and the sound section on a mobile PCB okay so you look at this PCB let’s say the PCB is having a sound problem this is the sound section of this PCB and if the phone is having a sound problem you have to start checking everything on this PCB because you see these two resistors right here they are the last components that are sending the sound directly to your speaker you understand so the sound I see is the icy that generates the sound that you hear so if this PCB is

having a sound problem then you can check everything from here because as soon as it leaves this place is going to your speaker and going to your head earphone jack you understand okay so I tell you what I think this will be all about this video today it’s a lot I never thought the video will be long this way so make sure you comment if you have any questions and like this video subscribe to this channel if you haven’t done that before okay cool man